With over 10 years of experience in creative direction, food industry professional Melissa Korhecz has perfected the art of briefing creative teams. She believes that good photography is never an accident and you can set yourself up for success by writing a comprehensive brief. Here’s how.
Let’s say you’ve got a big project coming up, a campaign with a budget for photography and design, it’s exciting and a bit overwhelming. With so much to coordinate it’s easy to assume the photographer will just ‘know’ what you need and leave it to them. However, it’s likely they don’t know your brand, they don’t know your product, they won’t even know what you’re trying to achieve, so it’s up to you to give them as much information as possible to get the best results.
Photography is an art form; it’s creative, imaginative, skillful, beautiful as well as technical. This also means it’s very subjective, which can lead to plenty of roadblocks when working with a diverse team. Having clear communication in a comprehensible brief will make it easy for the graphic designer, photographer and stylist to all work on the project and achieve the desired outcome seamlessly. Everyone will be clear on the vision, not only for the approval process but also to achieve results.
There is a fair bit of work involved before even starting to write the photography brief so it’s a great idea to understand the whole process before jumping straight in. This is how I look at the process:
- Research
- Plan execution of campaign — print, digital etc.
- Design layouts
- Book photoshoot and observe deadlines
- Write photography brief
- Research
Conducting research to plan a campaign will comprise of many different aspects, however here I am focusing in on the visual aspect. Research is important to see what the competition is doing – what’s working for them or what’s not and leverage off what they have already learned. Explore what’s trending and what is getting results from an audience similar to yours.
To start forming a vision for your campaign, gather style ideas, reference images, font examples, colour palettes and for food photography, recipe inspiration. Jump onto Pinterest, instagram top chefs, google images, iStock and collect images that will inspire your project.
- Plan execution
It’s important to give thought early on to how this campaign will be executed to accommodate design concepts and requirements. Advertising spaces vary in sizes and shapes and accounting for this will save stress later. The whole point of this planning stage is to decide what you need to deliver so you can take the right steps to getting there.
- Design layouts
Now onto the look and feel. For the photography to fit seamlessly with the design, the basis of the design will need to be prepared at this stage before jumping into writing the photography brief. Design layouts will need to be created for all the different shapes and sizes that were planned in step 2 so it’s clear how many variations are required or if one image will suffice.
Using inspirational images as part of the design concept is a great way to convey the desired style and mood of the photography, not only will it form part of the brief but it will also help with getting approvals for photography before the photoshoot.
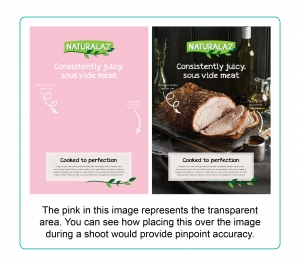
Once the design is created, prepare a PNG file of the artwork with transparent areas for where the photography fits. Supply this to the photographer so it can be used on the day of the shoot as an overlay. This allows for elements in the photography to work around any text or shapes that are part of the design without any guesswork.
Being prepared with transparent PNG’s allows the photography to flawlessly work with the design elements – this really is the trick to perfect results. No guesswork!
- Book photoshoot and observe deadlines
The photoshoot can definitely be booked earlier especially if the photographer books out far in advance, however I’ve put this step here as now you’ll have a clear understanding of what will be required from a photoshoot. You will know if it’s a day shoot or a three day shoot and you won’t have to rush through the preparation to write a brief since it’s already done.
The photography brief needs to be with the photographer and stylist 14 days before the shoot so they have time to prepare. Planning is super important, make sure you understand all the required deadlines to bring your project together.
- Write the photography brief
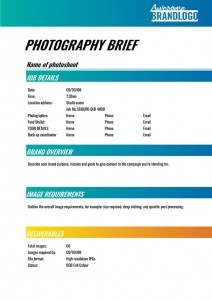
Here we go. The cover page should include all the basics –
- Name of the photoshoot for reference
- The date of the shoot – what day does this brief relate to (very important when multiple shoots are being booked)
- What time is everyone expected to show up
- Where the shoot is taking place
- Contact details of who will be involved (important if any unexpected emergencies occur the morning of the shoot)
- An overview of the project/brand to give the job some context
- The deadline for when the final images are required
- How many images will be delivered
- Any other specific image requirements.
All of this information should appear on the first page, setting expectations from the start and minimising any confusion later on.
 Each image/set requires its own brief to cover these 12 aspects:
- Hero of photo – What are you photographing? Start the brief with stating the hero of the photo, the subject/product/recipe – whatever it is you are trying to sell or display. Specify if the focus is a recipe or to accompany recipe instructions.
- Angle of shot – Based on the design concepts you should now have a good idea whether the shot will be from overhead, close in at eye level or shot from higher up. Here is an example of the angles:
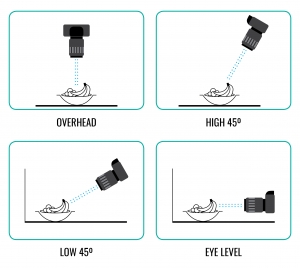
In a Low 45 and eye level shot you see the surface meeting the background wall, usually more of the wall than the surface. In a High 45 and overhead you won’t see any background wall, only the surface.
- Shots required – This is where you need to specify if the photo will be portrait or landscape, usually to suit the final use of the image. Also specify what variations of this image you require for example, with and without talent, whole cake and a piece cut from the cake etc.
- Total number of shots – add up all the variations to be clear what is required.
- Project overview/ purpose – outline the objective of this photo, explain what it is being used for, give a background on the brand to set the tone, this helps to add context for the photographer and stylist.
- Audience – who is this campaign/project targeted towards?
- Styling description – with a bit of help from your initial design concepts and the inspirational images you’ve collected, write a description of how you want the set to be styled. Things you should include:
Overall style of the image – modern, rustic, boutique, antique, deco, mexican etc.
Describe the colour and type of surface
What will be the background/wall if this is visible (for Low 45 and Eye Level angles)
What style of plates and cutlery – modern, antique, rustic etc.
Colour of crockery and napery
Describe the level of light – a great way to describe the lighting and mood is by time of day or a type of venue, for example, breakfast at an outdoor cafe or dim lighting in an Irish pub at night time. Setting the scene like this instantly helps other people visualise the setting based on their own experiences.
How you want the food to present – any specific cooking instructions, type of vegetables, garnishes, set as if it’s just cooked, just served, just begun being eaten
- Photography example – Use a picture to support the description of your setting, lighting, surfaces.
- Styling example – Use a picture to support the description of how the food presents, cutlery, crockery.
- You will supply – If you have any props you want to use in the shoot, list it here so the stylist knows they don’t need to source their own. If you are supplying the ingredients, products, also ensure to list it so there are no double ups and avoid being charged for it.
- Stylist / photographer to supply – be clear on what the stylist and photographer will need to bring to the shoot.
- Example application – Place an image here of the design concept with placeholder images to show how the image will be used in the artwork.
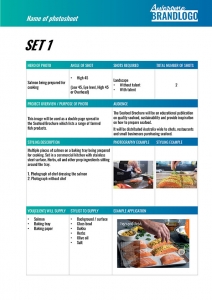
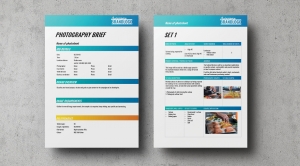
Example Brief pg2
Once you’ve completed this for every shot required, it’s helpful to order them logically for the day of the shoot. The best way of doing this is by grouping the shots by the angles required, then by backgrounds if there are any the same, or by lighting tone. Doing this minimises the amount of set changes and allows the day to run smoothly and efficiently.
Now the brief is complete, it provides all the information for someone to understand exactly what is required. Get manager approval on this to avoid any misunderstandings and ensure everyone agrees with the style direction.
Supply the brief to the photographer at least 14 days before the photoshoot to ensure there’s enough time for the photographer and stylist to prepare all equipment and props. This also allows time for the photographer to review the brief and provide an accurate quote on t
he service, minimising any surprises later on.
Don’t forget to supply the PNG overlays ahead of the shoot so everything can run smoothly.
Then all that’s left is to enjoy the day on set!


